Adjusting faulty overlocker timing

It had suddenly started missing a huge number of stitches in overlock mode and you could clearly see see that the needle thread was not being caught by the bottom looper.
It eventually turned out to be a problem with the needle guard, whereby it had been knocked when a needle broke and was now rubbing against the needle pushing it away from the bottom looper, thus preventing a stitch being formed.
However in researching and establishing the cause, I came up with a simple and effective method of setting the top and bottom looper timing which appears to be fairly generic.
The exact distances depend upon the design of the needle guard for instance, but the general principle of the timing is pretty universal, especially as the actual overlocker mechanism is quite generic and only the casings vary much. I suspect that they are made by one manufacturer and bought in.
The ELX705 needles are standard, so likewise the retraction height at which the needle hook recess is presented to the looper, is quite fixed.
Bottom Looper
Loosen off the clamp nut on the shaft which rotates the looper assembly to and fro and remove the needle plate and foot.
Simply take the needle down to its full depth and then retract by 2 to 2 1/2 mm. This does not have to be completely precise and you can do it by eye. I lined up the needle head against a suitable point on the foot mechanism, the needles were Schmetz and have a handy colour ring ID system, which on these needles were 2 rings just over 2mm total width, so simplicity itself.

Then set the the tip of the looper to be just at the rightmost edge of the back of the rightmost needle (viewed from the front) and clamp in position. There must be a small gap between the looper and the needle hook recess, enough just so that they do not touch, but close enough that the looper goes behind the thread. This can be varied by moving the whole assembly inwards or outwards along the shaft.
Adjust the needle guard so that the needle passes in and out of it without touching it and with a slightly larger gap to the front side. Using feeler guages is the best way if it is a 2 part guard, but if fixed, just put it in the middle, slightly towards the back surface of the guard.
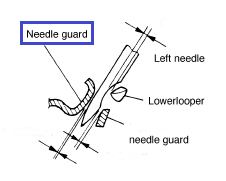
Then tighten the whole thing up, without moving anything! Easier to write than to do, tightening the clamp bolt first making sure the looper tip did not move then checking and adjusting the needle guard seems to work best.
Top Looper
The top Looper can be set simply by having the needle at its highest point and setting the tip of the looper to be over the centre of the needle plate.
This ensures the leftmost needle catches the looper thread and as the other needles descend, the looper moves into position under them.
Adjustment was likewise made by slackening the looper assembly clamping mechanism, in this case an allen bolt. There is some lateral movement along the shaft which allows moving the looper hook towards the needle, so that it passes close but does not touch.
That is all there is to it, besides checking and re-checking for any fouling of needle or looper hooks and doing quite a bit of hand cranked testing before attempting a powered test run.